Archive


Visual Studio 2010 單鍵發行簡單使用
Visual Studio 2010 單鍵發行簡單使用 Web.Release.config
Visual Studio 2010 版提供了一個相當方便的功能【單鍵發行】讓網站開發者只需要花費一次的時間就可以享受到往後的便利,在使用 Visual Studio 2008以前版本想要達到【單鍵發行】需要安裝 Web Deployment Project 既然現在內建了,那就應該是要會用,設定方法已經有很多文章可以搜尋的到了,所以這裡 demo 簡單的介紹 新增的 兩種 Web.Config 內的 Web.Release.config 設定方法
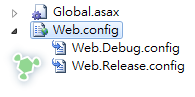
專案建立後可以看到 Web.config 變成有包含 Group Item 的樣子,點下去就可以看到多了Web.Release.config 和 Web.Debug.config 兩個檔案
本文的重點是 Web.Release.config 因為 Web.Debug.config 通常就是預設的 Web.config 而且設定方法都一樣所以不介紹它,點開 Web.Release.config 後會看到以下詳盡的註解
<?xmlversion="1.0"encoding="utf-8"?><!-- 有關使用 web.config 轉換的詳細資訊,請造訪 http://go.microsoft.com/fwlink/?LinkId=125889 --><!--在下面的範例中,"SetAttributes" 轉換只會在 "Match" 定位程式找到值為 "MyDB" 的屬性 "name" 時,才將 "connectionString" 的值變更為使用 "ReleaseSQLServer"。<connectionStrings><add name="MyDB"connectionString="Data Source=ReleaseSQLServer;Initial Catalog=MyReleaseDB;Integrated Security=True"xdt:Transform="SetAttributes" xdt:Locator="Match(name)"/></connectionStrings>--><system.web><compilationxdt:Transform="RemoveAttributes(debug)"/><!--在下面的範例中,"Replace" 轉換將會取代 web.config 檔案的整個 <customErrors> 區段。請注意,因為在 <system.web> 節點之下只有一個 customErrors 區段,所以不需要使用 "xdt:Locator" 屬性。<customErrors defaultRedirect="GenericError.htm"mode="RemoteOnly" xdt:Transform="Replace"><error statusCode="500" redirect="InternalError.htm"/></customErrors>--></system.web></configuration>
以上的註解其實還滿容易了解的,拿一個簡單範例來說
假設在開發環境中你的 資料庫位置在於 127.0.0.1 那在 Web.Config 一定會有一個連線字串長這樣
<connectionStrings>
<add name=”MyDB”
connectionString=”Data Source=127.0.0.1;Initial Catalog=MyReleaseDB;Integrated Security=True”/>
</connectionStrings>當然這樣的連線字串給客戶時是不會通的,以往都是用手動調整 Web.Config 給客戶,這種方式不但麻煩而且經常忘記,並且發佈給客戶的檔案應該都要給 Release 版這篇文章有提到為什麼該用 Release([筆記]編譯時遇到 無法載入 System.Data.Entity.Design.AspNet.EntityDesignerBuildProvider 錯誤的解決方法) 這時候只需要開啟 Web.Release.config 調整如下
<connectionStrings><addname="MyDB"connectionString="Data Source=demo.tc;Initial Catalog=MyReleaseDB;Integrated Security=True"xdt:Transform="SetAttributes"xdt:Locator="Match(name)"/></connectionStrings>這樣子再使用 Release 組件組態發行的時候就會自動更改 將 127.0.0.1 改成 demo.tc 了,其中的重點就在於 name 和
xdt:Locator=”Match(name)” 這兩段,因為我們今天要改的是連線字串所以就是包在 connectionStrings 標籤內 利用了 Match(name) 告訴轉換器 當發現 connectionStrings 內有 name=MyDB 的就會置換掉,算是很容易理解,如果有多個就寫多次就好,以下用經常性很多的 appSettings 來做示範
<appSettings><addkey="emailAccount"value="service@com.tw"xdt:Transform="SetAttributes"xdt:Locator="Match(key)"/><addkey="emailPassword"value="1234"xdt:Transform="SetAttributes"xdt:Locator="Match(key)"/><addkey="systemFromEmail"value="service@com.tw"xdt:Transform="SetAttributes"xdt:Locator="Match(key)"/></appSettings>可以看到因為 appSettings 並不是用 name 而是用 key 所以 Match 就是使用Match(key) 而非 Match(name),利用以上的方法可以很快的置換開發機與正式機不同的設定,讓部屬的時候需要手動調整的部份降低到最少。
如果你是使用 ASP.NET MVC 你可能會發現在使用 Release 編譯並且有開編譯 View 時很容易發生
在應用程式層級之外使用註冊為 allowDefinition=’MachineToApplication’ 的區段發生錯誤。錯誤的原因可能是虛擬目錄尚未在 IIS 中設定為應用程式。 這錯誤,這原因是因為殘留檔案的影響解決方法為在你的專案(方案)上使用清除專案(方案)後再重新編譯一次即可,當然你有更簡單的作法安裝 VSCommands 2010 這套件後方案總管上就會有掃把圖示可以按,按下去後你每次編譯的時候都會清除 obj 內的檔案

Reference from: http://demo.tc/Post/661
Cache Manager 快取總管
Cache Manager 快取總管-管理 Web 網站快取物件的好幫手
大家都知道在開發網頁的時候因為 Server 的數量遠不及 Client 所以經常會使用到 Cache 技巧,不管是 OutCache 或是 RunTime Cache 都是降低 Server 負載的好方式,但是你有沒有想過到底 Cache 放對東西了嗎?或是放了太多一樣的東西,如果快取用的不好不但沒有幫助到效能反而可能拖累整個 Server ,因此 demo 要推薦一個早在 2006 年就推出的好東西,它可以讓我們方便快速的看到快取的狀態和內容進而調整快取的數量與值。// //
- 檔案名稱:Cache Manager
- 官方網站:http://aspalliance.com/cachemanager/default.aspx
- 檔案版本:1.0.60115.01
- 介面語言:洋文
- 授權方式:網頁程式
IIS 6 註冊法
<addverb="*"path="CacheManager.axd"type="AspAlliance.CacheManager.CacheManagerPageFactory,AspAlliance.CacheManager"/>
IIS 7 註冊法
<addname="CacheManager"verb="*"path="CacheManager.axd"type="AspAlliance.CacheManager.CacheManagerPageFactory,AspAlliance.CacheManager"/>
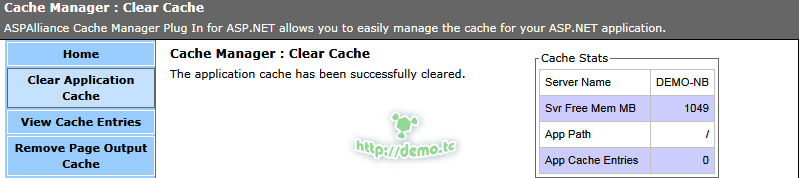
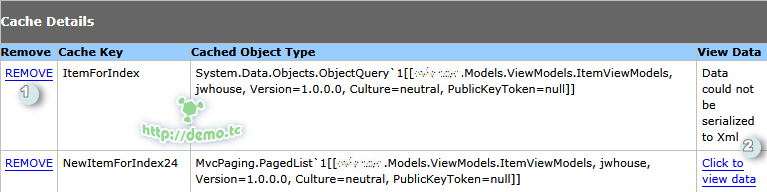
你可以在這頁看到伺服器還剩下多少記憶體和你已經使用了幾個快取物件(RunTime Cache)
<locationpath="CacheManager.axd"><system.web><authorization><denyusers="?"/></authorization></system.web></location>
<locationpath="CacheManager.axd"><system.web><authorization><allowroles="Admin"/><denyusers="*"/></authorization></system.web></location>


Reference from:http://demo.tc/Post/663
Creating and Hosting Awesome Axure Libraries
Want to make your own Axure libraries? This is a short how-to guide on getting the most out of it.
- Plan
- Choose a central theme.
- Make a list of widgets that will be included.
- Determine a common style to use throughout the library. This may include color, grid, typography, interactivity, and copy.
- Create
- Open Axure RP.
- In the widgets pane on the left, click the “Wireframe” dropdown and choose “Create library…”
- Save the new document with a short, clear name—this will be the name that shows up in the library droplist for everyone.
- Create each widget just like you would create new pages in a normal prototype.
- Polish
- Name everything that may be interactive. A dynamic panel for showing a calendar should be named something like “panel – calendar”. A submit button should be something like “button – submit”. This will help your users during annotation and spec generation.
- Add Rollover, MouseDown, Selected, and Disabled states to interactive shapes like buttons. Right click the object > Edit Button Shape > Edit Rollover Style (etc).
- Many widgets may contain more than one element. Group them together (ctrl + G) to ensure they don’t get separated when your users move them around.
- Sort the widgets. This is difficult because you have to do it manually and there is no best sort order. Play around with sorting options, such as alphabetical vs. order or importance, to find what’s right for you. It’s worth the effort.
- Add custom thumbnails. Another pain-in-the-butt task that will improve the professionalism of your library tenfold. Take your inner icon designer out for a spin and start producing 32 x 32 px thumbnails in .png format. Apply them to widgets by right clicking the Widget > “Widget Properties” > “Import Icon”. Make liberal use of screen grabs. Even your lamest effort at producing an icon will look better than the grainy compressed default that Axure spits out.
- Add descriptions. I don’t always do this, but for complex widgets, it can be good to explain them a bit. Right click the Widget > “Widget Properties”. Put your description in the text area.
- Distribute
- Hosting .rp / .rplib files is fraught with issues due to their resemblance to .zip files. There is one true method for hosting these things successfully (take my word for it): Put the .rp / .rplib file(s) in a folder, and zip the folder. This is the file you distribute.
- Announce
- The best places to announce Axure libraries are:
- Twitter (plug: I’ll probably RT you if you direct a message to @lorenbaxter).
- On the Axure Forum.
- Submit to Axure’s official list of resources.

reference from:http://www.acleandesign.com/2010/04/creating-and-hosting-awesome-axure-libraries/
Axure Better Defaults Library v2
Reference from: http://www.acleandesign.com/2010/04/axure-better-defaults-library-v2/
This is version 2 of the Better Defaults library, expanded to sixty five (or so) interactive and cleanly styled widgets. Use it in place of the standard widget set.
Reasons to use these widgets include:
- Consistent and improved styling.
- Polished interactivity.
- Standardized labeling.
- Expanded set of shapes & controls.
- Rollover, MouseDown, Selected, and Disabled styles for most controls.
- Includes all defaults.
This is for version 5.5 and above. Put the extracted .rplib file in your “My Documents\My Axure RP Libraries\” folder (Windows) or your “Documents\Axure\Libraries” folder (Mac).

 TheWillWillWeb
- 如何讓 LINQPad 查詢直接當成 Console 來執行
- 如何攔截並記錄 HttpClient 發出的所有 HTTP Request 與 Response 資料
- Microsoft 365 帳號遭到詐騙或被駭客入侵後的解鎖方法
- 快速上手 Visual Studio Code (VSCode) 擴充套件開發
- 如何在 Windows 打造一個完全沒問題的 Python 執行環境
- 使用 Ollama 執行 TAIDE 的 TAIDE-LX-7B-Chat-4bit 大語言模型
- 如何透過 System.Text.Json 序列化輸出完整的 Unicode 字元
- 如何在 Windows 打造 OpenCC 中文繁簡轉換工具
- 認識 Microsoft Entra ID 中的企業應用程式與服務主體物件
- 整理開發者應該知道的 Google 最新 Gemini API 相關知識
Inside AdWords
- An error has occurred; the feed is probably down. Try again later.
Analytics Talk
- Understanding the Google Analytics Cohort Report
- Using Offline and Online data to drive Google Analytics Remarketing
- Understanding Cross Device Measurement and the User-ID
- Universal Analytics: Now out of beta!
- Advanced Content Tracking with Universal Analytics
- Hits, Sessions & Users: Understanding Digital Analytics Data
- How to Use Google Analytics Content Grouping: 4 Business Examples
- How to Set Up Google Analytics Content Grouping
- Dimension Widening: Import data directly into Google Analytics
- Bye Bye JavaScript! Auto Event Tracking with Google Tag Manager
Google Webmaster Central Blog
- An error has occurred; the feed is probably down. Try again later.
Yahoo! Developer Network Blog
- An error has occurred; the feed is probably down. Try again later.
