Archive
Help Google index your mobile site
(This post was largely translated from our Japanese Webmaster Central Blog.)It seems the world is going mobile, with many people using mobile phones on a daily basis, and a large user base searching on Google’s mobile search page. However, as a webmaster, running a mobile site and tapping into the mobile search audience isn’t easy. Mobile sites not only use a different format from normal desktop site, but the management methods and expertise required are also quite different. This results in a variety of new challenges. As a mobile search engineer, it’s clear to me that while many mobile sites were designed with mobile viewing in mind, they weren’t designed to be search friendly. I’d like to help ensure that your mobile site is also available for users of mobile search.Here are troubleshooting tips to help ensure that your site is properly crawled and indexed:Verify that your mobile site is indexed by GoogleIf your web site doesn’t show up in the results of a Google mobile search even using the ‘site:’ operator, it may be that your site has one or both of the following issues:Googlebot may not be able to find your site
Googlebot, our crawler, must crawl your site before it can be included in our search index. If you just created the site, we may not yet be aware of it. If that’s the case, create a Mobile Sitemap and submit it to Google to inform us to the site’s existence. A Mobile Sitemap can be submitted using Google Webmaster Tools, in the same way as with a standard Sitemap.Googlebot may not be able to access your site
Some mobile sites refuse access to anything but mobile phones, making it impossible for Googlebot to access the site, and therefore making the site unsearchable. Our crawler for mobile sites is “Googlebot-Mobile”. If you’d like your site crawled, please allow any User-agent including “Googlebot-Mobile” to access your site. You should also be aware that Google may change its User-agent information at any time without notice, so it is not recommended that you check if the User-agent exactly matches “Googlebot-Mobile” (which is the string used at present). Instead, check whether the User-agent header contains the string “Googlebot-Mobile”. You can also use DNS Lookups to verify Googlebot.Verify that Google can recognize your mobile URLsOnce Googlebot-Mobile crawls your URLs, we then check for whether the URL is viewable on a mobile device. Pages we determine aren’t viewable on a mobile phone won’t be included in our mobile site index (although they may be included in the regular web index). This determination is based on a variety of factors, one of which is the “DTD (Doc Type Definition)” declaration. Check that your mobile-friendly URLs’ DTD declaration is in an appropriate mobile format such as XHTML Mobile or Compact HTML. If it’s in a compatible format, the page is eligible for the mobile search index. For more information, see the Mobile Webmaster Guidelines.If you have any question regarding mobile site, post your question to our Webmaster Help Forum and webmasters around the world as well as we are happy to help you with your problem.
Running desktop and mobile versions of your site
(This post was largely translated from our Japanese version of the Webmaster Central Blog )
Recently I introduced several methods to ensure your mobile site is properly indexed by Google. Today I’d like to share information useful for webmasters who manage both desktop and mobile phone versions of a site.
One of the most common problems for webmasters who run both mobile and desktop versions of a site is that the mobile version of the site appears for users on a desktop computer, or that the desktop version of the site appears when someone finds them from a mobile device. In dealing with this scenario, here are two viable options:
Redirect mobile users to the correct version
When a mobile user or crawler (like Googlebot-Mobile) accesses the desktop version of a URL, you can redirect them to the corresponding mobile version of the same page. Google notices the relationship between the two versions of the URL and displays the standard version for searches from desktops and the mobile version for mobile searches.
If you redirect users, please make sure that the content on the corresponding mobile/desktop URL matches as closely as possible. For example, if you run a shopping site and there’s an access from a mobile phone to a desktop-version URL, make sure that the user is redirected to the mobile version of the page for the same product, and not to the homepage of the mobile version of the site. We occasionally find sites using this kind of redirect in an attempt to boost their search rankings, but this practice only results in a negative user experience, and so should be avoided at all costs.
On the other hand, when there’s an access to a mobile-version URL from a desktop browser or by our web crawler, Googlebot, it’s not necessary to redirect them to the desktop-version. For instance, Google doesn’t automatically redirect desktop users from their mobile site to their desktop site, instead they include a link on the mobile-version page to the desktop version. These links are especially helpful when a mobile site doesn’t provide the full functionality of the desktop version — users can easily navigate to the desktop-version if they prefer.
Switch content based on User-agentSome sites have the same URL for both desktop and mobile content, but change their format according to User-agent. In other words, both mobile users and desktop users access the same URL (i.e. no redirects), but the content/format changes slightly according to the User-agent. In this case, the same URL will appear for both mobile search and desktop search, and desktop users can see a desktop version of the content while mobile users can see a mobile version of the content.
However, note that if you fail to configure your site correctly, your site could be considered to be cloaking, which can lead to your site disappearing from our search results. Cloaking refers to an attempt to boost search result rankings by serving different content to Googlebot than to regular users. This causes problems such as less relevant results (pages appear in search results even though their content is actually unrelated to what users see/want), so we take cloaking very seriously.
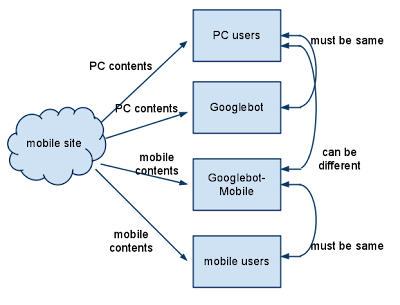
So what does “the page that the user sees” mean if you provide both versions with a URL? As I mentioned in the previous post, Google uses “Googlebot” for web search and “Googlebot-Mobile” for mobile search. To remain within our guidelines, you should serve the same content to Googlebot as a typical desktop user would see, and the same content to Googlebot-Mobile as you would to the browser on a typical mobile device. It’s fine if the contents for Googlebot are different from the one for Googlebot-Mobile.
One example of how you could be unintentionally detected for cloaking is if your site returns a message like “Please access from mobile phones” to desktop browsers, but then returns a full mobile version to both crawlers (so Googlebot receives the mobile version). In this case, the page which web search users see (e.g. “Please access from mobile phones”) is different from the page which Googlebot crawls (e.g. “Welcome to my site”). Again, we detect cloaking because we want to serve users the same relevant content that Googlebot or Googlebot-Mobile crawled.
Diagram of serving content from your mobile-enabled site
We’re working on a daily basis to improve search results and solve problems, but because the relationship between PC and mobile versions of a web site can be nuanced, we appreciate the cooperation of webmasters. Your help will result in more mobile content being indexed by Google, improving the search results provided to users. Thank you for your cooperation in improving the mobile search user experience.
Reference from: by Jun Mukai, Software Engineer, Mobile Search Team in Google Webmaster Central Blog
Introducing AdWords Comparison Ads
Today we’re excited to begin testing a new feature of AdWords called AdWords Comparison Ads, which lets users compare multiple, relevant offers more easily. Comparison Ads is part of our continuing effort to make ads more relevant and useful to our users and to help you, our advertisers, reach the people who are most interested in your products and services.
AdWords uses a host of targeting and relevancy signals to determine the best ads for each query. However, sometimes a user’s query doesn’t provide enough information for us to confidently predict what they want. Take, for example, users who search for “mortgage.” Do they want a new home loan or a refinance? Do they want a fixed rate or an adjustable rate loan? Comparison Ads improves the ad experience on Google.com by letting users specify exactly what they are looking for and helping them quickly compare relevant offers side by side.
With Comparison Ads, you can also target your offers at a more granular level, leading to more valuable, qualified leads. To see how it works, let’s use our mortgage example. Users searching for “mortgage” on Google.com may see a promotion from Comparison Ads prompting them to select the type of loan they are looking for and to compare various rates.
If they click the promotion, users are taken to a page with more detailed sponsored results. They can choose directly from the offers listed on that page, or they can further refine their search by providing additional information like income and home value. By giving users the ability to refine their search on a number of relevant attributes, we are able to show more targeted ads and provide you with more valuable leads.
Once users find an offer that matches their specific needs, they can either call you directly or request a quote. If a user requests a quote, Google automatically anonymizes the user’s phone number and sends you a unique code that you can use to contact the user. You only pay if a user calls the phone number on your offer or fills out a form to request a quote.
While Comparison Ads is still an early-stage feature, we’ve focused on a number of ways to enhance the user experience:
- Speed — Comparison Ads shows targeted offers in less than a second. There are no long forms for users to fill out – Users see specific offers immediately and only need to fill in additional information if they wish to further refine their results.
- Transparency — Comparison Ads only shows real products. There are no teaser rates, or bait and switch offers. Comparison Ads also standardizes the information presented to users, making it easy for them to sort and compare offers on a side by side basis.
- Privacy — Comparison Ads won’t send advertisers any user information, including anonymized phone numbers, unless the user explicitly requests more information about an advertiser’s offer.
At this time, Comparison Ads will only show to a small number of users in select U.S. states and is only available to a limited number of advertisers in the mortgage/refinance space. Over time, we’ll increase the number of users who see Comparison Ads offers as well as the number of advertisers able to participate.


Reference from: Posted by Dan Friedman, Inside AdWords crew
New alerts for your campaigns
Alerts are a great way to stay on top of changes in your account. In addition to the account alerts already available for billing and campaign maintenance, you can also use custom alerts to monitor shifts in key metrics like clicks and cost. We’d like to tell you about two additional alert options that we’re introducing today.
First, we’ve added alerts for new keyword and budget ideas in the Opportunities tab. Ideas are personalized tips to help you potentially improve your campaigns’ effectiveness. New ideas are usually generated for campaigns and ad groups every few weeks, but you may miss ideas that can expand your coverage and boost your traffic if you don’t check the Opportunities tab regularly. Now, when there are new ideas available for your review, you’ll see them highlighted along with the rest of your campaign alerts.
Second, if you’re using AdWords conversion tracking, you can now create custom alerts for changes in conversion volume, conversion rate, and cost per conversion. By setting alerts for your conversion data, you can make sure that you’re quickly notified about fluctuations in your key metrics.
Please note that we’re still working to bring custom alerts to all linked accounts for My Client Center (MCC) users. In the meantime, you can still set custom alerts for your individual accounts if you’re able to log into them directly.

Reference from: Posted by Dan Friedman, Inside AdWords crew
Ads Sitelinks – Increasing choice and relevancy in search ads
As part of our ongoing commitment to helping users find the information they’re seeking online, we’re happy to announce the launch of Ad Sitelinks.
Ad Sitelinks is a new AdWords feature that allows you to extend the value of your existing AdWords ads by providing additional links to content deep within your sites. Rather than sending all users to the same landing page, Ad Sitelinks will display up to 4 additional Destination URLs on your search-based text ad for users to choose from. By providing users with more options, you can create richer, more relevant ads that improve the value of your brand terms and other targeted keywords.

With Ad Sitelinks, you can point to specific information on your site such as gift registries, special deals, holiday or event-related promotions, and store locators. Early participants in Ad Sitelinks, like Priceline.com, found that presenting multiple link options made it easier to direct users to relevant information on their sites, driving them deeper into the conversion funnel.
Currently, the option to set up Ad Sitelinks will only appear for advertisers whose ads meet a certain high quality threshold.
If your account qualifies to run this feature, you’ll find the option to set up Ad Sitelinks in your Campaign Settings tab — it will appear as “Show additional links to my site” under the “Ad extensions” section.
To learn more about Ad Sitelinks, read our FAQ in the Help Center.
Reference from: Dan Friedman, Inside AdWords crew
Verifying a Blogger blog in Webmaster Tools
You may have seen our recent announcement of changes to the verification system in Webmaster Tools. One side effect of this change is that blogs hosted on Blogger (that haven’t yet been verified) will have to use the meta tag verification method rather than the “one-click” integration from the Blogger dashboard. The “Webmaster Tools” auto-verification link from the Blogger dashboard is no longer working and will soon be removed. We’re working to reinstate an automated verification approach for Blogger hosted blogs in the future, but for the time being we wanted you to be aware of the steps required to verify your Blogger blog in Webmaster Tools.
Step-By-Step Instructions:
In Webmaster Tools
1. Click the “Add a site” button on the Webmaster Tools Home page
2. Enter your blog’s URL (for example, googlewebmastercentral.blogspot.com) and click the “Continue” button to go to the Manage verification page
3. Select the “Meta tag” verification method and copy the meta tag providedIn Blogger
4. Go to your blog and sign in
5. From the Blogger dashboard click the “Layout” link for the blog you’re verifying
6. Click the “Edit HTML” link under the “Layout” tab which will allow you to edit the HTML for your blog’s template
7. Paste the meta tag (copied in step 3) immediately after the <head> element within the template HTML and click the “SAVE TEMPLATE” button
In Webmaster Tools
8. On the Manage Verification page, confirm that “Meta tag” is selected as the verification method and click the “Verify” buttonYour blog should now be verified. You’re ready to start using Webmaster Tools!
Posted by Jonathan Simon, Webmaster Trends Analyst

應用 IIS 6.0 的 Gzip 壓縮功能降低網路傳輸量
生存在資訊爆炸的網頁程式設計師們應該都會遇到網站效能不佳的問題,然而網站效能不佳有多種原因,舉凡 Web Server 本身的效能問題、系統架構設計不良、後端資料庫負載過重及設計不良,Web Server 將網頁內容傳輸到使用者瀏覽器的網路傳輸問題等等,這些都是需要面對的問題,網路傳輸問題最簡單也最容易解決的就是降低Web Server傳輸到使用者瀏覽器的網頁內容大小,降低網頁內容大小也有多種方法,例如把HTML檔案的換行及不必要的空白字元移除,CSS 盡量設計共用架構不要使用 Inline,壓縮 Javascript 檔案,縮小引用的圖檔等,還有一個大部分 Web Server 如: WebSphere、APACHE、IIS 5.0 以上都支援的 GZIP HTTP 壓縮功能,不過你用壓縮功能一定要犧牲一些 CPU Time ,目前大部分入口網站也都使用此項功能來減少頻寬的使用率,有效的提高網頁瀏覽的速度,我的 E 政府 (www.gov.tw)、Yahoo(tw.yahoo.com) 等大型入口網站也都有使用 GZIP,這也說明了他是個很普遍的技術,如果想提升瀏覽速度的話,不妨盡快評估導入此功能。
我們可以使用 HttpWatch 工具來證明上述的網站使用了 Gzip 壓縮技術,左邊視窗的 Accept-Encoding 屬性表示瀏覽器有支援 Gzip,右邊視窗的 Content-Encoding 則表示目前的網頁內容有使用 Gzip 壓縮 :
1. 我的E政府 http://www.gov.tw
2. 台灣雅虎奇摩 tw.yahoo.com
3. 點部落(尚未使用任何壓縮,因此無Content-Encoding屬性)
我們現在就來了解一下如何在 IIS 6.0 上設定 Gzip,來壓縮靜態檔案及動態檔案,這裡的步驟應該有不少的 Blog 文章說明,不過我還是自己做個紀錄,以後就不需要到處去找資料了。
1. 開啟網際網路資訊服務(IIS)管理員,並勾選啟用直接 Metabase 編輯,如此就可以在修改 IIS Metabase 檔設定後,各網站便立即生效,不然就得在設定後執行 IISReset 這是 Production 正式機所不允許的。

2. 於 IIS 管理員選擇「網站」、「內容」、「服務」頁籤,勾選「壓縮應用程式檔案」、「壓縮靜態檔案」,暫存目錄的大小限制可依需求做設定,一般不建議限制,不然資料夾的使用空間可是需要隨時注意才行。
「壓縮應用程式檔案」- 就 是開啟 IIS Server 端動態網頁的即時壓縮網頁資料內容,例如 : .asp、.aspx、.php、.jsp 等,IIS Server 並不會儲存這些動態檔所產生的網頁內容的壓縮副本,而是即時壓縮後將內容傳送給瀏覽器,所以他 比較耗 CPU Time 。
「壓縮靜態檔案」- IIS Server 會先檢查靜態檔案暫存目錄下,是否目前的 Request 檔的壓縮檔案,並檢查原檔是否已被修改過,若修改過則會重新壓縮該檔,然後將壓縮的檔案內容回傳給瀏覽器,靜態檔如: .htm、.html、.cs、.js 等。
其實 IIS Server在傳送給瀏覽器時,都會先檢查瀏覽器是否支援 GZip 壓縮功能,不然 IIS Server 如果傳送已壓縮過的網頁內容給瀏覽器時,瀏覽器不支援 Gzip 的話,將無法正常顯示網頁資料給使用者瀏覽。

3.新增一個網頁服務延伸,這裡便是以人工方式來擴充 IIS 的 ISAPI。
你必須留意到 ISAPI Extension 、ISAPI Filter 是不同的架構,不過他們的目的都是為了擴充 IIS 的功能,你可以參考 IIS 6.0 的應用程式執行模式 會有一些說明。

4.接下來是 IIS metabase 檔的設定,此檔案是以 XML 格式儲存的,這是最重要的步驟,且必須小心每個設定的屬性值,不然會發生嚴重的系統錯誤,建議設定前先備份該檔案。
檔案的路徑預設是在 C:\Windows\System32\inetsrv\MetaBase.xml ,你可以使用任何的文字編輯器來修改此檔案的 <IIsCompressionScheme /> ,不過我建議可以使用 IIS Metabase Explorer 工具(IIS 6.0 Resource Kit Tools)來協助編輯, 這樣比較不容易出錯。
在此你會發現我們編輯了兩個 <IIsCompressionScheme /> 不過他們是屬於不同的 HTTP 壓縮演算法,一個是 Deflate,一個是 Gzip,我們就順便設定這兩個,因為他們只是壓縮演算法不同而已。
<IIsCompressionScheme Location ="/LM/W3SVC/Filters/Compression/deflate" HcCompressionDll="%windir%\system32\inetsrv\gzip.dll" HcCreateFlags="0" HcDoDynamicCompression="TRUE" HcDoOnDemandCompression="TRUE" HcDoStaticCompression="FALSE" HcDynamicCompressionLevel="9" HcFileExtensions="htm html txt js css doc txt ptt xls htc" HcOnDemandCompLevel="10" HcPriority="1" HcScriptFileExtensions="asp exe aspx asmx dll" > </IIsCompressionScheme> <IIsCompressionScheme Location ="/LM/W3SVC/Filters/Compression/gzip" HcCompressionDll="%windir%\system32\inetsrv\gzip.dll" HcCreateFlags="1" HcDoDynamicCompression="TRUE" HcDoOnDemandCompression="TRUE" HcDoStaticCompression="TRUE" HcDynamicCompressionLevel="9" HcFileExtensions="htm html txt js css htc doc ptt xls" HcOnDemandCompLevel="10" HcPriority="1" HcScriptFileExtensions="asp exe aspx asmx dll" > </IIsCompressionScheme>這裡提醒你的是 : 如果你的網站使用了 ASP.NET AJAX 的話,建議你不要壓縮 .axd 檔案,不然網頁很容易發生錯誤,因為,瀏覽器不見得支援解壓縮 .axd,所以你必須做取捨的,不 過,你可以在 ScriptManager 或 ToolkitScriptManager 控制項設定 ScriptMode=”Release” 或 ScriptMode=”Auto”(預設值) 搭配 Web.config 的 <system.web><compilation debug=”false” defaultLanguage=”c#” /></system.web> 設定,依經驗也可以達到 ASP.NET AJAX 一些檔案的壓縮效果。如果真的要壓縮網站的 .axd 檔,建議要做網站功能的回歸測試。<參考:縮減AJAX的axd內容大小>
Update 2009/02/11 : 使用 HttpWatch 針對 ASP.NET AJAX 的 WebResource.axd 及 ScriptResource.axd 側錄後發現,其實依照上述的設定後,會由 AJAX 的 HttpHandler 自動以 GZIP 壓縮上述兩個 .axd ,雖然你的網站可能不只這兩個 .axd 檔,但為了避免發生不可預期的問題,所以,建議盡量避免在 IIS 上又開啟 .axd 檔壓縮。
使用 IIS Metabase Explorer 編輯 :
我們變更了三個設定,若有需要的話請自行修改其他屬性值設定。
- HcFileExtensions-htm, html, txt , js, cs, htc, doc, ptt, xls
- HcDynamicCompressionLevel-9 (值越大壓縮效果越好,但越耗 CPU Time)
- HcScriptFileExtensions-asp, exe, aspx, asmx, dll
4. 設定完畢後須做網站的功能回歸測試以確保所有功能均正常運作,若發現有在同一台 IIS Server 上有網站不能使用 Gzip 壓縮的話,也可單獨排除該網站不進行壓縮。
要關閉識別元為 132465789 網站的靜態壓縮功能這邊提供兩種方法,另外你也可以直接修改 Metabase.xml 檔:
- 你可以使用指令方式設定該網站的 DoStaticCompression 屬性為 0 (False),Usertype屬性為 file 。
cscript C:\Inetpub\AdminScripts\adsutil.vbs set w3svc/123465789/root/DoStaticCompression False
- 使用 IIS Metabase Expolorer 來新增一個 DoStaticCompression DWORD

要關閉識別元為 132465789 網站的動態壓縮功能這邊提供兩種方法,另外你也可以直接修改 Metabase.xml 檔:
- 你可以使用指令方式設定該網站的 DoDynamicCompression 屬性為 0 (False),Usertype屬性為 file 。
cscript C:\Inetpub\AdminScripts\adsutil.vbs set w3svc/123456789/root/DoDynamicCompression False
- 使用 IIS Metabase Expolorer 來新增一個 DoDynamicCompression DWORD
總結
我試過一些熱心網友分享或是 Open Source 的應用 GZIP 的 ASP.NET HTTPModule 來壓縮 ASP.NET AJAX 網站的網頁資料內容,
例如: Code Project 的 HTTP Compression Module 此功能可壓縮 WebResource.axd 檔,但是,在 .NET Framework 3.5 的 ASP.NET AJAX 環境測試依然有部分網頁來是會產生錯誤,
因此,我還是放棄對 axd 檔的壓縮,畢竟很少有解決方案是能夠百分百滿足需求的,依 80 / 20 法則,我認為我所使用的 IIS 啟用 GZIP 壓縮,
並搭配 ASP.NET AJAX 的 ScriptMamager 、 ToolkitScriptManager 的 ScriptMode 屬性設定為 Release 方法已經足夠,所以,在此分享經驗給大家參考。


Reference from: http://www.dotblogs.com.tw/jameswu/archive/2009/01/17/6846.aspx
 TheWillWillWeb
- 如何讓 LINQPad 查詢直接當成 Console 來執行
- 如何攔截並記錄 HttpClient 發出的所有 HTTP Request 與 Response 資料
- Microsoft 365 帳號遭到詐騙或被駭客入侵後的解鎖方法
- 快速上手 Visual Studio Code (VSCode) 擴充套件開發
- 如何在 Windows 打造一個完全沒問題的 Python 執行環境
- 使用 Ollama 執行 TAIDE 的 TAIDE-LX-7B-Chat-4bit 大語言模型
- 如何透過 System.Text.Json 序列化輸出完整的 Unicode 字元
- 如何在 Windows 打造 OpenCC 中文繁簡轉換工具
- 認識 Microsoft Entra ID 中的企業應用程式與服務主體物件
- 整理開發者應該知道的 Google 最新 Gemini API 相關知識
Inside AdWords
- An error has occurred; the feed is probably down. Try again later.
Analytics Talk
- Understanding the Google Analytics Cohort Report
- Using Offline and Online data to drive Google Analytics Remarketing
- Understanding Cross Device Measurement and the User-ID
- Universal Analytics: Now out of beta!
- Advanced Content Tracking with Universal Analytics
- Hits, Sessions & Users: Understanding Digital Analytics Data
- How to Use Google Analytics Content Grouping: 4 Business Examples
- How to Set Up Google Analytics Content Grouping
- Dimension Widening: Import data directly into Google Analytics
- Bye Bye JavaScript! Auto Event Tracking with Google Tag Manager
Google Webmaster Central Blog
- An error has occurred; the feed is probably down. Try again later.
Yahoo! Developer Network Blog
- An error has occurred; the feed is probably down. Try again later.
